Visualization Library 2.1.0

A lightweight C++ OpenGL middleware for 2D/3D graphics

VL     Star     Watch     Fork     Issue

[Download] [Tutorials] [All Classes] [Grouped Classes]
OpenGL Texture Mapping Tutorial
Intro

The complete code for this tutorial can be found in "src/examples/Applets/App_Texturing.cpp".

"Texturing" is the technique used to apply in various ways an image over the surface of an object. Textures can be used to change or modify the color, the transparency and even the lighting properties of an object. In this tutorial we will go through the implementation of App_Texturing, the texturing test part of the Visualization Library regression test suite. This will give us the chance to see how to use several standard and advanced texturing techniques like 2D texturing, multi-texturing, 3D textures, 1D and 2D texture arrays, sphere-mapping and cubemaps environment mapping. We will also see how to use the texture lod bias to simulate opaque reflections.

The most important classes involved in the texturing process are:

Textures with Visualization Library

Currently Visualization Library supports all kinds of textures supported by OpenGL up to OpenGL 4.1 which is:

You can setup and create textures in three different ways:

Notes on vl::Image:

Texture parameters:

All the parameters that are part of the texture object, such as texture filtering modes, anisotropic filtering, clamping modes etc. can be accessed via vl::Texture::getTexParameter(). See the code below for a few examples.

Creating the texturing test

Our test like all the other tests is a subclass of BaseDemo so the only thing we do is to derive from it, implement a set of functions testing the different texturing technique and reimplementing the virtual functions initEvent() and updateScene() to initialize and animate our test.

class App_Texturing: public BaseDemo
{
public:

After which we start implementing a method for each texture type test.
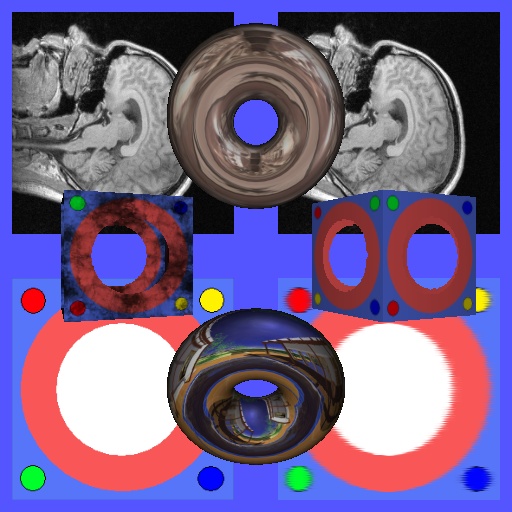
Multitexturing

This example shows how to use multiple textures to enhance the detail of your 3D objects. We will create 2 cubes: the one on the right will use a single texture, the one on the left will use multitexturing to add detail to the base texture. The two cubes will be animated by the updateScene() method.

void multitexturing()
{
{
Log::error("Multitexturing not supported.\n");
return;
}
// create a box with texture coordinates
const bool generate_tex_coords = true;
ref<Geometry> box = makeBox( vec3(0,0,0), 5,5,5, generate_tex_coords );
box->computeNormals();
// IMPORTANT: makeBox() filled for use box->texCoordArray(0) however in order to use multi-texturing we need
// texture coordinates also for unit #1 so we make texture unit #1 share the texture coordinates with unit #0.
box->setTexCoordArray(1, box->texCoordArray(0));
// load base texture
// note: TF_UNKNOWN tells VL to set the texture format to whatever format the image is.
ref<Texture> tex_holebox = new Texture("/images/holebox.tif", TF_UNKNOWN, mMipmappingOn );
tex_holebox->getTexParameter()->setMagFilter(TPF_LINEAR);
tex_holebox->getTexParameter()->setMinFilter(TPF_LINEAR_MIPMAP_LINEAR);
// load detail texture
ref<Texture> tex_detail = new Texture("/images/detail.tif", TF_UNKNOWN, mMipmappingOn );
tex_detail->getTexParameter()->setMagFilter(TPF_LINEAR);
tex_detail->getTexParameter()->setMinFilter(TPF_LINEAR_MIPMAP_LINEAR);
// IMPORTANT: since we requested mipmapping we set the MinFilter to GL_LINEAR_MIPMAP_LINEAR, i.e. trilinear filtering.
// Note also that using a mipmapped filter with a texture that has no mipmaps will typically show a black texture.
// You can set the MinFilter to any of GL_NEAREST, GL_LINEAR, GL_NEAREST_MIPMAP_NEAREST, GL_LINEAR_MIPMAP_NEAREST,
// GL_NEAREST_MIPMAP_LINEAR, GL_LINEAR_MIPMAP_LINEAR. However rembember that you can set the MagFilter only to
// GL_NEAREST or GL_LINEAR as mipmapping does not make any sense for texture magnification.
ref<Light> light = new Light;
// single texture effect with alpha testing
ref<Effect> fx_right_cube = new Effect;
fx_right_cube->shader()->setRenderState( light.get(), 0 );
fx_right_cube->shader()->enable(EN_LIGHTING);
fx_right_cube->shader()->enable(EN_DEPTH_TEST);
fx_right_cube->shader()->enable(EN_BLEND);
fx_right_cube->shader()->enable(EN_ALPHA_TEST);
fx_right_cube->shader()->gocAlphaFunc()->set(FU_GEQUAL, 0.98f);
fx_right_cube->shader()->gocLightModel()->setTwoSide(true);
fx_right_cube->shader()->gocTextureImageUnit(0)->setTexture( tex_holebox.get() );
// multi-texture effect with alpha testing
ref<Effect> fx_left_cube = new Effect;
fx_left_cube->shader()->setRenderState( light.get(), 0 );
fx_left_cube->shader()->enable(EN_LIGHTING);
fx_left_cube->shader()->enable(EN_DEPTH_TEST);
fx_left_cube->shader()->enable(EN_BLEND);
fx_left_cube->shader()->enable(EN_ALPHA_TEST);
fx_left_cube->shader()->gocAlphaFunc()->set(FU_GEQUAL, 0.98f);
fx_left_cube->shader()->gocLightModel()->setTwoSide(true);
fx_left_cube->shader()->gocTextureImageUnit(0)->setTexture( tex_holebox.get() );
fx_left_cube->shader()->gocTextureImageUnit(1)->setTexture( tex_detail.get() );
fx_left_cube->shader()->gocTexEnv(1)->setMode(TEM_MODULATE); // modulate texture #0 and #1
// add right box
mRightCubeTransform = new Transform;
rendering()->as<Rendering>()->transform()->addChild(mRightCubeTransform.get());
sceneManager()->tree()->addActor( box.get(), fx_right_cube.get(), mRightCubeTransform.get() );
// add left box
mLeftCubeTransform = new Transform;
rendering()->as<Rendering>()->transform()->addChild(mLeftCubeTransform.get());
sceneManager()->tree()->addActor( box.get(), fx_left_cube.get(), mLeftCubeTransform.get() );
}

3D textures

In this paragraph we will use 3D textures to implement a sort of animation on a 2d flat plane.

Since we want to animate the texture coordinates of our plane we manually allocate a vl::ArrayFloat3 to be used as the texture coordinate array for the texture unit #0. Note also that since VBOs are activated by default after animating the texture coordintes we need to tell VL that the textue coordinates' VBOs should be updated. See the updateScene() method for the details.

void texture3D()
{
{
Log::error("Texture 3D not supported.\n");
return;
}
// Create a 2x2 vertices quad facing the camera
mQuad3DTex = makeGrid( vec3(0,0,0), 10.0f, 10.0f, 2, 2 );
// Rotate plane toward the user, otherwise it would be on the x/z plane
mQuad3DTex->transform( mat4::getRotation(90, 1,0,0), false );
// Texture coordinates to be animated in updateScene()
mTexCoords_3D = new ArrayFloat3;
mTexCoords_3D->resize( 2*2 );
mQuad3DTex->setTexCoordArray(0, mTexCoords_3D.get());
// Effect used by the actor
ref<Effect> fx_3d = new Effect;
fx_3d->shader()->enable(EN_DEPTH_TEST);
// Add and position the actor in the scene
Actor* act_3d = sceneManager()->tree()->addActor( mQuad3DTex.get(), fx_3d.get(), new Transform );
act_3d->transform()->setLocalAndWorldMatrix( mat4::getTranslation(-6,+6,-6) );
// Setup a 3D texture with mipmapping
ref<Texture> texture_3d = new Texture;
// Load "/volume/VLTest.dat" which is a 3D image and prepare a 3D texture from it
texture_3d->createTexture3D( "/volume/VLTest.dat", TF_UNKNOWN, mMipmappingOn );
texture_3d->getTexParameter()->setMagFilter(TPF_LINEAR);
texture_3d->getTexParameter()->setMinFilter(TPF_LINEAR_MIPMAP_LINEAR);
fx_3d->shader()->gocTextureImageUnit(0)->setTexture( texture_3d.get() );
}

2D Texture Arrays

Using 2D texture arrays (GL_TEXTURE_2D_ARRAY) is very similar to using normal 3D textures (GL_TEXTURE_3D), but with the following differences:

For our demo we will use the 2D texture array in the very same way as we did for the 3D textures, but in this case we will put the textured plane on the top right corner.

void texture2DArray()
{
{
Log::error("Texture 2d array not supported.\n");
return;
}
// Create a 2x2 vertices quad facing the camera
mQuad2DArrayTex = makeGrid( vec3(0,0,0), 10.0f, 10.0f, 2, 2 );
// Rotate plane toward the user
mQuad2DArrayTex->transform( mat4::getRotation(90, 1,0,0), false );
// Texture coordinates to be animated in updateScene()
mTexCoords_2DArray = new ArrayFloat3;
mTexCoords_2DArray->resize( 2*2 );
mQuad2DArrayTex->setTexCoordArray(0, mTexCoords_2DArray.get());
// Create the effect used by the actor
ref<Effect> fx_2darray = new Effect;
fx_2darray->shader()->enable(EN_DEPTH_TEST);
// Add and position the actor in the scene
Actor* act_2darray = sceneManager()->tree()->addActor( mQuad2DArrayTex.get(), fx_2darray.get(), new Transform );
act_2darray->transform()->setLocalAndWorldMatrix( mat4::getTranslation(+6,+6,-6) );
// Load a 3D image, VL considers 3D images equivalent to an array of 2D images.
ref<Image> img_volume = loadImage("/volume/VLTest.dat");
m2DArraySize = img_volume->depth();
// Create the 2D texture array and bind it to unit #0
ref<Texture> texture_2darray = new Texture;
texture_2darray->createTexture2DArray( img_volume.get(), TF_RGBA, mMipmappingOn );
texture_2darray->getTexParameter()->setMagFilter(TPF_LINEAR);
texture_2darray->getTexParameter()->setMinFilter(TPF_LINEAR_MIPMAP_LINEAR);
fx_2darray->shader()->gocTextureImageUnit(0)->setTexture( texture_2darray.get() );
// IMPORTANT
// We need a GLSL program that uses 'sampler2DArray()' to access the 1D and 2D texture arrays!
GLSLProgram* glsl = fx_2darray->shader()->gocGLSLProgram();
glsl->attachShader( new GLSLFragmentShader("/glsl/texture_2d_array.fs") );
// Bind the sampler to unit #0
glsl->gocUniform("sampler0")->setUniformI(0);
}

The fragment shader glsl/texture_2d_array.fs used in the example looks like this:

#extension GL_ARB_texture_array: enable
uniform sampler2DArray sampler0;
void main(void)
{
gl_FragColor = texture2DArray(sampler0, gl_TexCoord[0].xyz);
}
1D Texture Arrays

For 1D texture arrays count the considerations that we did for 2D texture arrays.

In this example we create again a plane oriented towards the views with the difference that this time instead of creating a simple plane with 2*2 vertices we create 2*img_holebox->height() vertices, that is, we cut the plane in img_holebox->height() slices. Each slice will be textured using a 1D texture taken from the 1D texture array. The resulting image will look very similar to a 2D textured quad.

void texture1DArray()
{
{
Log::error("Texture 1d array not supported.\n");
return;
}
// Load a 2D texture, VL considers 2D images equivalent to arrays of 1D images.
ref<Image> img_holebox = loadImage("/images/holebox.tif");
m1DArraySize = img_holebox->height();
// Create a grid with img_holebox->height() slices
mQuad1DArrayTex = makeGrid( vec3(0,0,0), 10, 10, 2, img_holebox->height() );
mQuad1DArrayTex->transform( mat4::getRotation(90, 1,0,0), false );
// Texture coordinates to be animated in updateScene()
mTexCoords_1DArray = new ArrayFloat2;
mTexCoords_1DArray->resize( 2 * img_holebox->height() );
mQuad1DArrayTex->setTexCoordArray(0, mTexCoords_1DArray.get());
// Create the effect used by the actor
ref<Effect> fx_1darray = new Effect;
fx_1darray->shader()->enable(EN_DEPTH_TEST);
// Add and position the actor in the scene
Actor* act_1darray = sceneManager()->tree()->addActor( mQuad1DArrayTex.get(), fx_1darray.get(), new Transform );
act_1darray->transform()->setLocalAndWorldMatrix( mat4::getTranslation(+6,-6,-6) );
// Create the 1D texture array and bind it to unit #0
ref<Texture> texture_1darray = new Texture;
texture_1darray->createTexture1DArray( img_holebox.get(), TF_RGBA, mMipmappingOn );
texture_1darray->getTexParameter()->setMagFilter(TPF_LINEAR);
texture_1darray->getTexParameter()->setMinFilter(TPF_LINEAR_MIPMAP_LINEAR);
fx_1darray->shader()->gocTextureImageUnit(0)->setTexture( texture_1darray.get() );
// IMPORTANT
// We need a GLSL program that uses 'sampler1DArray()' to access the 1D and 2D texture arrays!
GLSLProgram* glsl = fx_1darray->shader()->gocGLSLProgram();
glsl->attachShader( new GLSLFragmentShader("/glsl/texture_1d_array.fs") );
glsl->gocUniform("sampler0")->setUniformI(0);
}

The fragment shader glsl/texture_1d_array.fs used in the example looks like this:

#extension GL_ARB_texture_array: enable
uniform sampler1DArray sampler0;
void main(void)
{
gl_FragColor = texture1DArray(sampler0, gl_TexCoord[0].xyz );
}
Texture Rectangle

A texture rectangle (GL_TEXTURE_RECTANGLE) is a special kind of 2D textures mainly used for post processing effects. They differ from normal 2D texture for the following:

void textureRectangle()
{
{
Log::error("Texture rectangle not supported.\n");
return;
}
ref<Image> img_holebox = loadImage("/images/holebox.tif");
// Create a box that faces the camera
// Generate non-normalized uv coordinates, i.e. from <0,0> to <img_holebox->width(), img_holebox->height()>
float s_max = (float)img_holebox->width();
float t_max = (float)img_holebox->height();
ref<Geometry> quad_rect = makeGrid( vec3(0,0,0), 10.0f, 10.0f, 2, 2, true, fvec2(0, 0), fvec2(s_max, t_max) );
quad_rect->transform( mat4::getRotation(90, 1,0,0), false );
// Effect used by the actor
ref<Effect> fx_rect = new Effect;
fx_rect->shader()->enable(EN_DEPTH_TEST);
// Add and position the actor in the scene
Actor* act_rect = sceneManager()->tree()->addActor( quad_rect.get(), fx_rect.get(), new Transform );
act_rect->transform()->setLocalAndWorldMatrix( mat4::getTranslation(-6,-6,-6) );
// Setup the texture rectangle
ref<Texture> texture_rectangle = new Texture;
// Note that mipmapping is not an option for texture rectangles since they do not support mipmaps
texture_rectangle->createTextureRectangle( img_holebox.get(), TF_RGBA );
// Set non-mipmapping filters for the texture
texture_rectangle->getTexParameter()->setMagFilter(TPF_LINEAR);
texture_rectangle->getTexParameter()->setMinFilter(TPF_LINEAR);
// GL_REPEAT (the default) is not allowed with texture rectangle so we set it to GL_CLAMP
texture_rectangle->getTexParameter()->setWrapS(TPW_CLAMP);
texture_rectangle->getTexParameter()->setWrapT(TPW_CLAMP);
texture_rectangle->getTexParameter()->setWrapR(TPW_CLAMP);
fx_rect->shader()->gocTextureImageUnit(0)->setTexture( texture_rectangle.get() );
}

Spherical mapping

Spherical mapping is a very simple and cheap way to simulate environmental reflection over an object using simple 2D textures.

All we need to use spherical mapping is:

For more information about spherical mapping see also "OpenGL Cube Map Texturing": http://developer.nvidia.com/object/cube_map_ogl_tutorial.html

In our test we will apply spherical mapping to a rotating torus.

void sphericalMapping()
{
if (Has_GLES)
{
Log::error("Spherical mapping texture coordinate generation not supported.\n");
return;
}
// Effect used by the actor
mFXSpheric = new Effect;
mFXSpheric->shader()->enable(EN_DEPTH_TEST);
mFXSpheric->shader()->enable(EN_CULL_FACE);
mFXSpheric->shader()->enable(EN_LIGHTING);
mFXSpheric->shader()->setRenderState( new Light, 0 );
// Add sphere mapped torus
// makeTorus() also generates the normals which are needed by GL_SPHERE_MAP texture coordinate generation mode
ref<Geometry> torus = makeTorus(vec3(), 8,3, 40,40);
mActSpheric = sceneManager()->tree()->addActor( torus.get(), mFXSpheric.get(), new Transform );
rendering()->as<Rendering>()->transform()->addChild( mActSpheric->transform() );
// Create a 2d texture sphere map
ref<Texture> texture_sphere_map = new Texture;
texture_sphere_map->createTexture2D( "/images/spheremap_klimt.jpg", TF_UNKNOWN, mMipmappingOn );
texture_sphere_map->getTexParameter()->setMagFilter(TPF_LINEAR);
texture_sphere_map->getTexParameter()->setMinFilter(TPF_LINEAR_MIPMAP_LINEAR);
mFXSpheric->shader()->gocTextureImageUnit(0)->setTexture( texture_sphere_map.get() );
// Enable spherical mapping texture coordinate generation for s and t
mFXSpheric->shader()->gocTexGen(0)->setGenModeS(TGM_SPHERE_MAP);
mFXSpheric->shader()->gocTexGen(0)->setGenModeT(TGM_SPHERE_MAP);
}

Cubemaps

Cubemapping is a very flexible technique used to achieve many different kinds of effects. Here we will use cubmapping to implement the so called "environment mapping" which is a technique that simulates the environmental reflection over an object. While using spherical mapping the reflection always faces the camera (unless you regenerate it on the fly every frame), cubemapping lets you use a single cubemap texture to simulate a much more realistic three-dimensional reflection.

For more information about spherical mapping see also "OpenGL Cube Map Texturing": http://developer.nvidia.com/object/cube_map_ogl_tutorial.html

All we need to use cubemapping is:

Note that you can load cubemap images in many different ways. You can assemble them on the fly using the vl::loadAsCubemap() functions or you can load it directly from a DDS file with the vl::loadImage() function.

We use the GL_CLAMP_TO_EDGE mode here to minimize the seams of the cubemaps. This does not remove the seams totally. In order to have a cubemap without seams the cubemap must be properly generated and adjusted by the texture artist.

Note that we use GL_REFLECTION_MAP texture generation mode for the S, T and R texture coordinates which requires the rendered geometry to have proper normals.

Note also the line:

mFXCubic->shader()->gocTextureMatrix(0)->setUseCameraRotationInverse(true);

This tells VL to put in the texture matrix the inverse of the camera rotation. This transforms into world-space the cubemap texture coordinates automatically generated by OpenGL, which would otherwise be in eye-space (ie. always facing the camera). Basically this way the virtual texture cube will be aligned with the world axes, which is what we want, instead of being aligned with the eye space axes.

void cubeMapping()
{
{
Log::error("Texture cubemap not supported.\n");
return;
}
ref<Image> img_cubemap = loadCubemap(
"/images/cubemap/cubemap00.png", // (x+) right
"/images/cubemap/cubemap01.png", // (x-) left
"/images/cubemap/cubemap02.png", // (y+) top
"/images/cubemap/cubemap03.png", // (y-) bottom
"/images/cubemap/cubemap04.png", // (z+) back
"/images/cubemap/cubemap05.png"); // (z-) front
// Effect used by the actor
mFXCubic = new Effect;
mFXCubic->shader()->enable(EN_DEPTH_TEST);
mFXCubic->shader()->enable(EN_CULL_FACE);
mFXCubic->shader()->enable(EN_LIGHTING);
mFXCubic->shader()->setRenderState( new Light, 0 );
// Add cube-mapped torus
// makeTorus() also generates the normals which are needed by GL_REFLECTION_MAP texture coordinate generation mode
ref<Geometry> torus = makeTorus( vec3(), 8,3, 40,40 );
mActCubic = sceneManager()->tree()->addActor( torus.get(), mFXCubic.get(), new Transform );
rendering()->as<Rendering>()->transform()->addChild( mActCubic->transform() );
// Create the cube-map texture
ref<Texture> texture_cubic = new Texture;
texture_cubic->createTextureCubemap( img_cubemap.get(), TF_RGBA, mMipmappingOn );
// Texture filtering modes
texture_cubic->getTexParameter()->setMagFilter(TPF_LINEAR);
texture_cubic->getTexParameter()->setMinFilter(TPF_LINEAR_MIPMAP_LINEAR);
// Clamp to edge to minimize seams
texture_cubic->getTexParameter()->setWrapS(TPW_CLAMP_TO_EDGE);
texture_cubic->getTexParameter()->setWrapT(TPW_CLAMP_TO_EDGE);
texture_cubic->getTexParameter()->setWrapR(TPW_CLAMP_TO_EDGE);
// Install the texture on unit #0
mFXCubic->shader()->gocTextureImageUnit(0)->setTexture( texture_cubic.get() );
// Enable automatic texture generation for s, t, r on unit #0
mFXCubic->shader()->gocTexGen(0)->setGenModeS(TGM_REFLECTION_MAP);
mFXCubic->shader()->gocTexGen(0)->setGenModeT(TGM_REFLECTION_MAP);
mFXCubic->shader()->gocTexGen(0)->setGenModeR(TGM_REFLECTION_MAP);
// Align the cube-map to the world space axes rather than eye space axes.
mFXCubic->shader()->gocTextureMatrix(0)->setUseCameraRotationInverse(true);
}

Applet initialization

The following function shows the simple steps used to initialize our test and the protected data used by our applet.

void initEvent()
{
// Log applet info
Log::notify(appletInfo());
// Default values
mMipmappingOn = true;
mLodBias = 0.0;
// Show all the texture types tests
multitexturing();
textureRectangle();
texture3D();
texture2DArray();
texture1DArray();
sphericalMapping();
cubeMapping();
}

Animation

The animation of the texture coordinates and of the transformed objects is implemented in the updateScene() virtual function as shown below:

void updateScene()
{
// 5 seconds period
float t = sin( Time::currentTime()*fPi*2.0f/5.0f) * 0.5f + 0.5f;
t = t * (1.0f - 0.02f*2) + 0.02f;
// Rotating cubes
{
mRightCubeTransform->setLocalMatrix( mat4::getTranslation(+6,0,0) * mat4::getRotation( Time::currentTime()*45, 0, 1, 0) );
mLeftCubeTransform ->setLocalMatrix( mat4::getTranslation(-6,0,0) * mat4::getRotation( Time::currentTime()*45, 0, 1, 0) );
}
// 3D texture coordinates animation
if (mTexCoords_3D)
{
// Animate the z texture coordinate.
mTexCoords_3D->at(0) = fvec3(0, 0, t);
mTexCoords_3D->at(1) = fvec3(0, 1, t);
mTexCoords_3D->at(2) = fvec3(1, 0, t);
mTexCoords_3D->at(3) = fvec3(1, 1, t);
// Mark texture coords as dirty to update its BufferObjects.
mTexCoords_3D->setBufferObjectDirty(true);
// Request the quad geometry to check its BufferObjects at the next rendering.
mQuad3DTex->setBufferObjectDirty(true);
}
// 2D texture array coordinates animation
if (mTexCoords_2DArray)
{
// Animate the z texture coordinate.
// Note that unlike for 3D textures in 2d array textures the z coordinate
// is not defined between 0..1 but between 1..N where N is the number of
// texture layers present in the texture array.
mTexCoords_2DArray->at(0) = fvec3(0, 0, t*m2DArraySize);
mTexCoords_2DArray->at(1) = fvec3(0, 1, t*m2DArraySize);
mTexCoords_2DArray->at(2) = fvec3(1, 0, t*m2DArraySize);
mTexCoords_2DArray->at(3) = fvec3(1, 1, t*m2DArraySize);
// Mark texture coords as dirty to update its BufferObjects.
mTexCoords_2DArray->setBufferObjectDirty(true);
// Request the quad geometry to check its BufferObjects at the next rendering.
mQuad2DArrayTex->setBufferObjectDirty(true);
}
// 1D texture array coordinates animation
if (mTexCoords_1DArray)
{
for(int i=0; i<m1DArraySize; ++i)
{
// Create some waving animation
float x_offset = 0.1f * cos( t*3.14159265f + 10.0f*((float)i/m1DArraySize)*3.14159265f );
// Note: the y texture coordinate is an integer value between 0 and N where N
// is the number of texture 1D layers present in the texture array
mTexCoords_1DArray->at(i*2+0) = fvec2(0+x_offset, (float)i);
mTexCoords_1DArray->at(i*2+1) = fvec2(1+x_offset, (float)i);
}
// Mark texture coords as dirty to update its BufferObjects.
mTexCoords_1DArray->setBufferObjectDirty(true);
// Request the quad geometry to check its BufferObjects at the next rendering.
mQuad1DArrayTex->setBufferObjectDirty(true);
}
// Spherical mapped torus animation
if (mActSpheric)
{
// Just rotate the torus
mActSpheric->transform()->setLocalMatrix( mat4::getTranslation(0,+6,0)*mat4::getRotation(45*Time::currentTime(),1,0,0) );
mActSpheric->transform()->computeWorldMatrix();
}
// Cube mapped torus animation
if (mActCubic)
{
// Just rotate the torus
mActCubic->transform()->setLocalMatrix( mat4::getTranslation(0,-6,0)*mat4::getRotation(45*Time::currentTime(),1,0,0) );
mActCubic->transform()->computeWorldMatrix();
}
}

Reflectivity

A classic method to simulate sharp/dull reflectivity is to manually change the lod bias via the glTexEnv() command. The Lod Bias modifies the way OpenGL selects the set of mipmaps to be used during the rendering. A higher lod bias will make OpenGL select mipmaps of a higher level (smaller images) thus the reflected image will look more blurry and less sharp. This will produce an effect similar to a rough and opaque surface. Instead, if the lod bias is set to 0 (default) the reflection will look very sharp and definite as if the surface was a perfectly polished mirror. In our test we can dynamically adjust the lod bias using the mouse wheel:

void mouseWheelEvent(int w)
{
// Change the LOD bias of the texture to simulate sharp/dull reflections.
mLodBias += w*0.3f;
mLodBias = clamp(mLodBias, 0.0f, 4.0f);
mFXSpheric->shader()->gocTexEnv(0)->setLodBias(mLodBias);
mFXCubic->shader()->gocTexEnv(0)->setLodBias(mLodBias);
}

Conclusions

This tutorial gave you the basic knowledge to start using several standard and advanced texturing techniques like 2D texturing, multi-texturing, 3D textures, 1D and 2D texture arrays, sphere-mapping, cubemap environment mapping and lod bias manipulation.